Hi! It has been a while since I’ve talked about continuous deployment. But that doesn’t mean we didn’t do anything with it anymore. On the contrary, we’ve been improving the way we set up projects over the last few years. Nowadays, we have a project workflow that works really well. Let me show you how we do it.
Agile
You probably have heard of Scrum. A neat project management framework that has a nice flow to stay involved with the customer, and focuses on improving your team and the process. However, when working with Scrum sprints, the focus lies on releasing the features the team committed to at the beginning of the sprint. This feels a bit odd when working with continuous deployment. We want to release every feature individually. As you know, priorities shift all the time. This means we need to be more flexible.
Kanban
That’s why we work with a Kanban board (from top to bottom, right to left), while keeping all Scrum events. We have a biweekly sprint demo and retrospective, and refine our stories just as in Scrum. But the work we do is continuous. This is also known as Scrumban.
Backlog
As usual, a Product Owner (PO) keeps track of the work that needs to be done. This is managed on the backlog. Here, the PO sorts the stories by priority, so we know what to refine first. Once a story is refined and ready for development, the story is moved to the first column of the Kanban board (Ready for development).
Kanban process
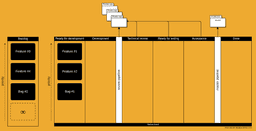
When a story is ready for development, it goes through the Kanban flow. In figure 1 you can see that two automated processes have been added. Once a story passes a white line, an automated process is starting in the background. This is one of the following processes:
- Review pipeline: Create a separate review application (with its own URL/link) in the cloud, so the changes can be viewed online (without having to build the application yourself locally)
- Master (main) pipeline: Bring your new feature to production, separately from other features.
This can be done quite easily when a developer creates a branch for every feature, and pushes that to the project repository.
When a review application is made available by the review pipeline, all other project members can view that application. A developer can verify if everything is correctly implemented (codewise and actual features). Then the tester and acceptor can check out the specific feature too. This enables everyone to check the feature before the code is actually accepted and merged into the main codebase.
When all automated tests have passed, and everyone is happy with the feature, the code of the feature branch can be merged to the production branch. The master pipeline then brings the new feature to production, and the story is done.
Review pipeline
In our automated processes, we want to ensure everything works as expected. We want all of our features to be ready for production. This can’t be done without automated tests. This is why we run our pipelines in stages.
The first stage tests our application on the lowest level. This way we can ensure our codestyle is up to par with the rest of the codebase, and business rules are verified to be working as expected. If something isn’t right, we will be notified very early in the process. This allows us to act fast, and quickly fix what’s wrong. “Fail early, fail often” to guarantee quality.
Next, the application is built. This includes what is already in production, plus the newly created feature. When this application is ready, it’s deployed to a cloud environment, where it’s hosted with its own URL. This allows the project members to check the review application, but not only humans…
Now that we have the review application ready in the cloud, just like the production application, we can automatically test that too! We use regression tests to verify that the main features of a website still work as expected, testing as if we’re an actual user. This saves us heaps of time so we don’t have to test the basic stuff manually over and over again.
Finally, when the new feature is accepted or canceled, the review application is destroyed. Now your cluster can scale down again and reduce costs.
Master pipeline
The master (main) pipeline is much like the review pipeline. The big difference is that we’re not deploying a new review application, but that we upgrade an acceptance/staging environment first. We do this to really ensure that everything is going to work in production. For smaller projects, or when the application is not ‘live’ yet, one could argue to skip this step. But for the bigger and live projects I recommend to keep it in the process.
Once all acceptance/staging tests have passed, the application can be deployed to production automatically. Because, why not?! You already know it works. And if there is an oversight that slipped through the cracks, the process allows you to quickly push another improvement through the flow.
Now, your feature is live on production! And your story can be moved to done.
This was just only about our proces in continuous deployment
In this blog, I’ve left out all the technical details and mainly showed you the process we work with. I will drop some tools below that we use in this process that work for us. If you have any more questions, or ideas for improvements, or need help setting such a workflow up yourself? Enrise can help you! Let us know, we’re happy to help.
Code and pipelines: GitLab (CI). Testing: PHPUnit, PHP ECS, Jest, Typescript checker, Prettier, ESLint. Hosting: Docker, Kubernetes, Google Cloud. Regression testing: Cypress.


